


GPS Arduino DMM
Création d'un GPS à l'aide d'Arduino
![]() Par
fab_seeker
Par
fab_seeker
Bonjour,
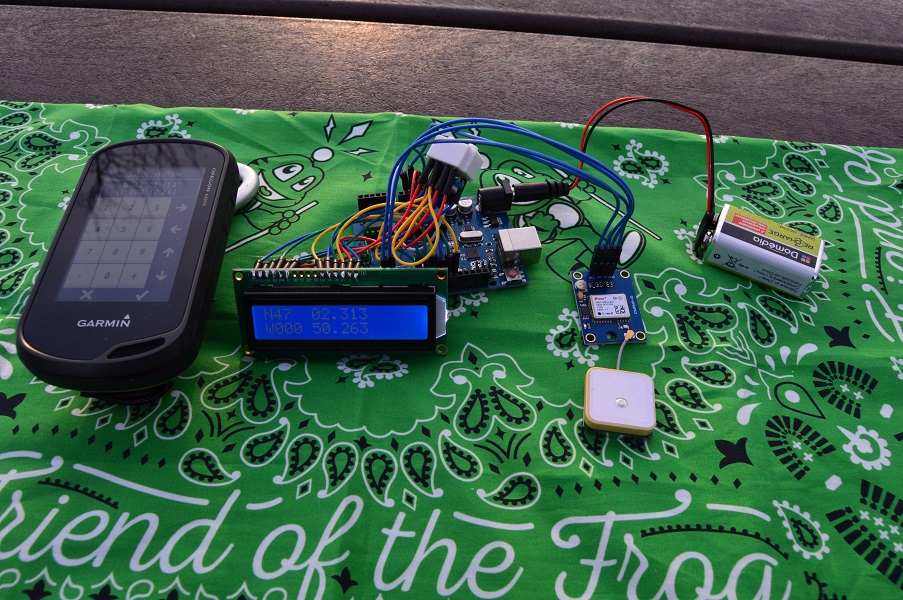
je vous partage ici un petit projet électronique que j'ai fait pour réaliser un GPS donnant les coordonnées au format DMM utilisé par le géocaching.
Une petite illustration du résultat à côté de mon GPS Garmin Oregon 600 :
Pour ce faire, il vous faudra :
-un module GPS UBlox NEO 6M
-un écran LCD 1602
-une carte Arduino UNO R3
-un potentiomètre 10Kohm
-un câble d'alimentation pile 9V pour la carte Arduino UNO R3
-bien sûr, quelques fils pour câbler et un peu d'étain pour souder :)
-j'ai également utilisé une mini plaque d'essai pour relier toutes les masses, tous les potentiels à +5V et pour fixer le potentiomètre
< J'ajouterai peut-être un schéma de câblage à l'avenir par ici. >
Connexions avec l'écran LCD :
- LCD RS connectée à la broche 7 de l'arduino uno R3
- LCD Enable connectée à la broche 8 de l'arduino uno R3
- LCD D4 connectée à la broche 9 de l'arduino uno R3
- LCD D5 connectée à la broche 10 de l'arduino uno R3
- LCD D6 connectée à la broche 11 de l'arduino uno R3
- LCD D7 connectée à la broche 12 de l'arduino uno R3
- LCD R/W connectée à la masse GND de l'arduino uno R3
- LCD VDD connectée à la masse GND de l'arduino uno R3
- LCD K connectée à la masse GND de l'arduino uno R3
- LCD VSS connectée au +5V de l'arduino uno R3
- LCD A connectée au +5V de l'arduino uno R3
Connexions avec le potentiomètre :
- La broche du milieu reliée à la broche VO de l'écran LCD
- Puis une broche restante à la masse GND et l'autre à +5V
Connexions du module ublox neo 6m :
Alimentation :
- La broche VCC connectée à 3,3V, la broche GND à la masse GND de l'arduino uno R3
RX et TX:
- TX du module ublox neo 6m connectée à la broche 2 de l'Arduino uno R3
- RX du module neo 6m connectée à la broche 3 de l'Arduino uno R3
Les différentes connexions sont rappelées en anglais dans les commentaires du sketch ci-dessous : (si vous décelez des erreurs n'hésitez pas à me prévenir).
/***********************************************************************/
/* GPS_DMM.ino by fabelec (Geocaching account: fab_seeker) */
/* GPS with coordinates for geocaching */
/* */
/* Purpose: get GPS coordinates at DMM format and display on 16*2 lcd */
/* */
/* Requires: */
/* - a UBlox NEO 6M gps module */
/* - a LCD screen 1602 */
/* - Arduino uno R3 */
/* - a 10K Potentiometer */
/* */
/* Note: */
/* When the program is downloaded and everything connected, adjust the */
/* contrast of the screen with the potentiometer. You should be able */
/* to go geocaching !! :D */
/* */
/* Example besides a Garmin Oregon 600: */
/* http://chercheetcache.e-monsite.com/medias/images/montage.jpg */
/* */
/***********************************************************************/
/* Libraries used: */
#include <SoftwareSerial.h>
#include <TinyGPS.h>
#include <math.h>
#include <LiquidCrystal.h>
/* Connections for the LCD screen:
-------------------------------
- LCD RS connected to the pin 7 of arduino uno R3
- LCD Enable connected to the pin 8 of arduino uno R3
- LCD D4 connected to the pin 9 of arduino uno R3
- LCD D5 connected to the pin 10 of arduino uno R3
- LCD D6 connected to the pin 11 of arduino uno R3
- LCD D7 connected to the pin 12 of arduino uno R3
- LCD R/W connected to the Ground GND
- LCD VDD to the Ground GND
- LCD K to the Ground GND
- LCD VSS to +5V
- LCD A to +5V
- Potentiometer 10K : a pin at +5V the other to the Ground GND
- the middle pin of the Potentiometer connected to LCD VO
*/
LiquidCrystal lcd(7, 8, 9, 10, 11, 12);
/* Variables: */
long lat, lon;
long latD, lonD, latM, lonM, latMM, lonMM;
char NS, EW;
bool SatOk = false;
/* Connections of ublox neo 6m:
----------------------------
Power supply:
- VCC of ublox neo 6m connected to 3,3V, and the GND to GND of arduino uno R3
RX and TX:
- TX of ublox neo 6m connected to the pin 2 of Arduino uno R3
- RX of ublox neo 6m connected to the pin 3 of Arduino uno R3
*/
SoftwareSerial gpsSerial(2,3);
/* Variable based on TinyGPS: */
TinyGPS gps;
void setup()
{
Serial.begin(19200);
gpsSerial.begin(9600);
lcd.begin(16, 2);
lcd.setCursor(0,0);
SatOk = false;
}
void loop()
{
while(gpsSerial.available() == false and SatOk == false){
lcd.setCursor(0,0);
lcd.print("Searching... ");
lcd.setCursor(0,1);
lcd.print(" ");
}
while(gpsSerial.available()){
if(gps.encode(gpsSerial.read())){
/* If it is the first time that gps coordinates are being displayed */
if (SatOk == false){
/* clear the screen (removes "Searching..." display) */
lcd.clear();
}
/* Set at true the variable memorizing that satellites conditions are Ok */
SatOk = true;
/* Get the Position read at XY format: */
gps.get_position(&lat,&lon);
/* Convert GPS Position Data to DMM format: */
if(lat>=0){NS = 'N';}
else{NS = 'S';}
if(lon>=0){EW = 'W';}
else{EW = 'E';}
lat = abs(lat);
lon = abs(lon);
latD = floor(lat/1000000);
lonD = floor(lon/1000000);
latM = floor(((lat-(latD*1000000))*60)/1000000);
lonM = floor(((lon-(lonD*1000000))*60)/1000000);
latMM = floor((((((lat-(latD*1000000))*60)-(latM*1000000))/1000)));
lonMM = floor((((((lon-(lonD*1000000))*60)-(lonM*1000000))/1000)));
/* Print latitude at the DMM format on lcd */
/* NS latD ° latM . latMM */
lcd.setCursor(0,0);
lcd.print(NS);
if(latD<10){lcd.print('0');}
lcd.print(latD);
lcd.print(" ");
if(latM<10){lcd.print('0');}
lcd.print(latM);
lcd.print('.');
if(latMM<100){lcd.print('0');}
if(latMM<10){lcd.print('0');}
lcd.print(latMM);
/* Print longitude at the DMM format on lcd */
/* EW lonD ° lonM . lonMM */
lcd.setCursor(0,1);
lcd.print(EW);
if(lonD<100){lcd.print('0');}
if(lonD<10){lcd.print('0');}
lcd.print(lonD);
lcd.print(" ");
if(lonM<10){lcd.print('0');}
lcd.print(lonM);
lcd.print('.');
if(lonMM<100){lcd.print('0');}
if(lonMM<10){lcd.print('0');}
lcd.print(lonMM);
delay(200);
}
}
}
Réglez le contraste de l'écran LCD en ajustant le potentiomètre, et allez à l'extérieur pour tester votre montage.
Bon bricolage à tous !