


Bonjour,
je vous partage ici un petit projet électronique que j'ai fait pour réaliser un GPS donnant les coordonnées au format DMM utilisé par le géocaching.
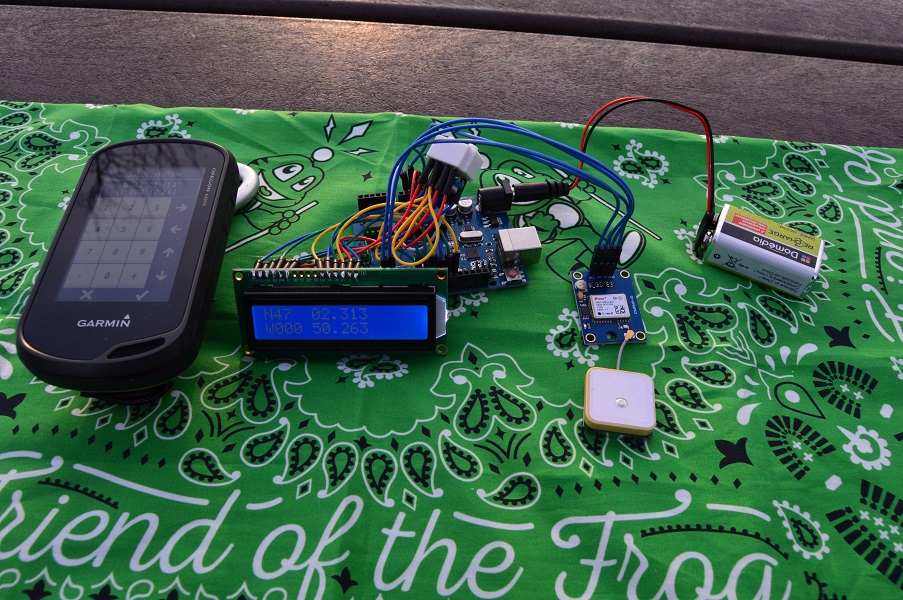
Une petite illustration du résultat à côté de mon GPS Garmin Oregon 600 :
Pour ce faire, il vous faudra :
-un module GPS UBlox NEO 6M
-un écran LCD 1602
-une carte Arduino UNO R3
-un potentiomètre 10Kohm
-un câble d'alimentation pile 9V pour la carte Arduino UNO R3
-bien sûr, quelques fils pour câbler et un peu d'étain pour souder :)
-j'ai également utilisé une mini plaque d'essai pour relier toutes les masses, tous les potentiels à +5V et pour fixer le potentiomètre
< J'ajouterai peut-être un schéma de câblage à l'avenir par ici. >
Connexions avec l'écran LCD :
- LCD RS connectée à la broche 7 de l'arduino uno R3
- LCD Enable connectée à la broche 8 de l'arduino uno R3
- LCD D4 connectée à la broche 9 de l'arduino uno R3
- LCD D5 connectée à la broche 10 de l'arduino uno R3
- LCD D6 connectée à la broche 11 de l'arduino uno R3
- LCD D7 connectée à la broche 12 de l'arduino uno R3
- LCD R/W connectée à la masse GND de l'arduino uno R3
- LCD VDD connectée à la masse GND de l'arduino uno R3
- LCD K connectée à la masse GND de l'arduino uno R3
- LCD VSS connectée au +5V de l'arduino uno R3
- LCD A connectée au +5V de l'arduino uno R3
Connexions avec le potentiomètre :
- La broche du milieu reliée à la broche VO de l'écran LCD
- Puis une broche restante à la masse GND et l'autre à +5V
Connexions du module ublox neo 6m :
Alimentation :
- La broche VCC connectée à 3,3V, la broche GND à la masse GND de l'arduino uno R3
RX et TX:
- TX du module ublox neo 6m connectée à la broche 2 de l'Arduino uno R3
- RX du module neo 6m connectée à la broche 3 de l'Arduino uno R3
Les différentes connexions sont rappelées en anglais dans les commentaires du sketch ci-dessous : (si vous décelez des erreurs n'hésitez pas à me prévenir).
/***********************************************************************/
/* GPS_DMM.ino by fabelec (Geocaching account: fab_seeker) */
/* GPS with coordinates for geocaching */
/* */
/* Purpose: get GPS coordinates at DMM format and display on 16*2 lcd */
/* */
/* Requires: */
/* - a UBlox NEO 6M gps module */
/* - a LCD screen 1602 */
/* - Arduino uno R3 */
/* - a 10K Potentiometer */
/* */
/* Note: */
/* When the program is downloaded and everything connected, adjust the */
/* contrast of the screen with the potentiometer. You should be able */
/* to go geocaching !! :D */
/* */
/* Example besides a Garmin Oregon 600: */
/* http://chercheetcache.e-monsite.com/medias/images/montage.jpg */
/* */
/***********************************************************************/
/* Libraries used: */
#include <SoftwareSerial.h>
#include <TinyGPS.h>
#include <math.h>
#include <LiquidCrystal.h>
/* Connections for the LCD screen:
-------------------------------
- LCD RS connected to the pin 7 of arduino uno R3
- LCD Enable connected to the pin 8 of arduino uno R3
- LCD D4 connected to the pin 9 of arduino uno R3
- LCD D5 connected to the pin 10 of arduino uno R3
- LCD D6 connected to the pin 11 of arduino uno R3
- LCD D7 connected to the pin 12 of arduino uno R3
- LCD R/W connected to the Ground GND
- LCD VDD to the Ground GND
- LCD K to the Ground GND
- LCD VSS to +5V
- LCD A to +5V
- Potentiometer 10K : a pin at +5V the other to the Ground GND
- the middle pin of the Potentiometer connected to LCD VO
*/
LiquidCrystal lcd(7, 8, 9, 10, 11, 12);
/* Variables: */
long lat, lon;
long latD, lonD, latM, lonM, latMM, lonMM;
char NS, EW;
bool SatOk = false;
/* Connections of ublox neo 6m:
----------------------------
Power supply:
- VCC of ublox neo 6m connected to 3,3V, and the GND to GND of arduino uno R3
RX and TX:
- TX of ublox neo 6m connected to the pin 2 of Arduino uno R3
- RX of ublox neo 6m connected to the pin 3 of Arduino uno R3
*/
SoftwareSerial gpsSerial(2,3);
/* Variable based on TinyGPS: */
TinyGPS gps;
void setup()
{
Serial.begin(19200);
gpsSerial.begin(9600);
lcd.begin(16, 2);
lcd.setCursor(0,0);
SatOk = false;
}
void loop()
{
while(gpsSerial.available() == false and SatOk == false){
lcd.setCursor(0,0);
lcd.print("Searching... ");
lcd.setCursor(0,1);
lcd.print(" ");
}
while(gpsSerial.available()){
if(gps.encode(gpsSerial.read())){
/* If it is the first time that gps coordinates are being displayed */
if (SatOk == false){
/* clear the screen (removes "Searching..." display) */
lcd.clear();
}
/* Set at true the variable memorizing that satellites conditions are Ok */
SatOk = true;
/* Get the Position read at XY format: */
gps.get_position(&lat,&lon);
/* Convert GPS Position Data to DMM format: */
if(lat>=0){NS = 'N';}
else{NS = 'S';}
if(lon>=0){EW = 'W';}
else{EW = 'E';}
lat = abs(lat);
lon = abs(lon);
latD = floor(lat/1000000);
lonD = floor(lon/1000000);
latM = floor(((lat-(latD*1000000))*60)/1000000);
lonM = floor(((lon-(lonD*1000000))*60)/1000000);
latMM = floor((((((lat-(latD*1000000))*60)-(latM*1000000))/1000)));
lonMM = floor((((((lon-(lonD*1000000))*60)-(lonM*1000000))/1000)));
/* Print latitude at the DMM format on lcd */
/* NS latD ° latM . latMM */
lcd.setCursor(0,0);
lcd.print(NS);
if(latD<10){lcd.print('0');}
lcd.print(latD);
lcd.print(" ");
if(latM<10){lcd.print('0');}
lcd.print(latM);
lcd.print('.');
if(latMM<100){lcd.print('0');}
if(latMM<10){lcd.print('0');}
lcd.print(latMM);
/* Print longitude at the DMM format on lcd */
/* EW lonD ° lonM . lonMM */
lcd.setCursor(0,1);
lcd.print(EW);
if(lonD<100){lcd.print('0');}
if(lonD<10){lcd.print('0');}
lcd.print(lonD);
lcd.print(" ");
if(lonM<10){lcd.print('0');}
lcd.print(lonM);
lcd.print('.');
if(lonMM<100){lcd.print('0');}
if(lonMM<10){lcd.print('0');}
lcd.print(lonMM);
delay(200);
}
}
}
Réglez le contraste de l'écran LCD en ajustant le potentiomètre, et allez à l'extérieur pour tester votre montage.
Bon bricolage à tous !


